| View previous topic :: View next topic |
| Author |
Message |
Redliner
Just got MTs

Joined: 22 Dec 2011
Odometer: 172
|
 Posted: Tue Feb 07, 2012 10:56 am Post subject: Posted: Tue Feb 07, 2012 10:56 am Post subject:
|
 |
|
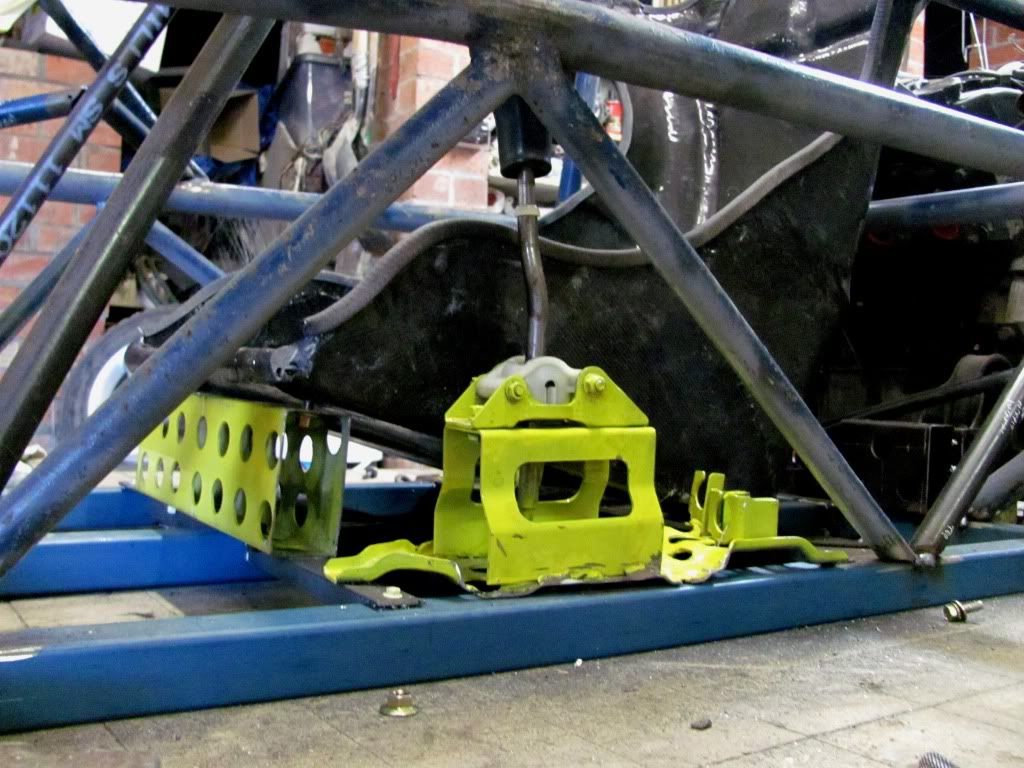
Tonight I cut the new stay between the front hoops, out of the larger steel required than what was in the frame I cannabalised. Then I started on the two bars that’ll go down from it’s ends to the front bullbar, resulting in a wedge shaped nose that I really like.
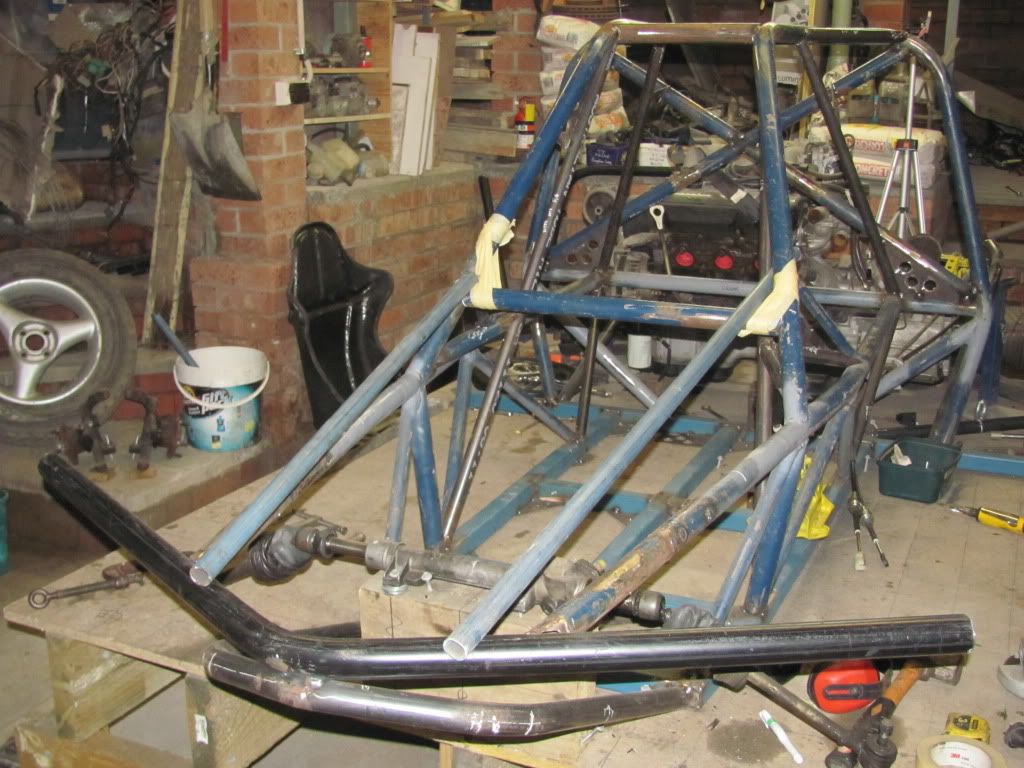
Test fitting revealed the Magna seat runners put the seat up a bit too high, so I’ve ditched having an adjustable seat and will weld in some 30mm angle that it can bolt straight onto. Playing around with the positioning of the gearstick it looks like I’ll have to relocate one of the small triangulation bars (tacked on either side of the steering wheel), to clear the gear knob. No worries. There’s enough re-enforcement there for a Dubai sky scraper!
This last pic shows how the front mount bar that runs under the engine will bolt up to the rear of the chassis, and probably where the gear shift cables will run.
|
|
| Back to top |
|
 |
|
|
Redliner
Just got MTs
Joined: 22 Dec 2011
Odometer: 172
|
| Posted: Fri Feb 10, 2012 10:10 am Post subject:
|
|
|
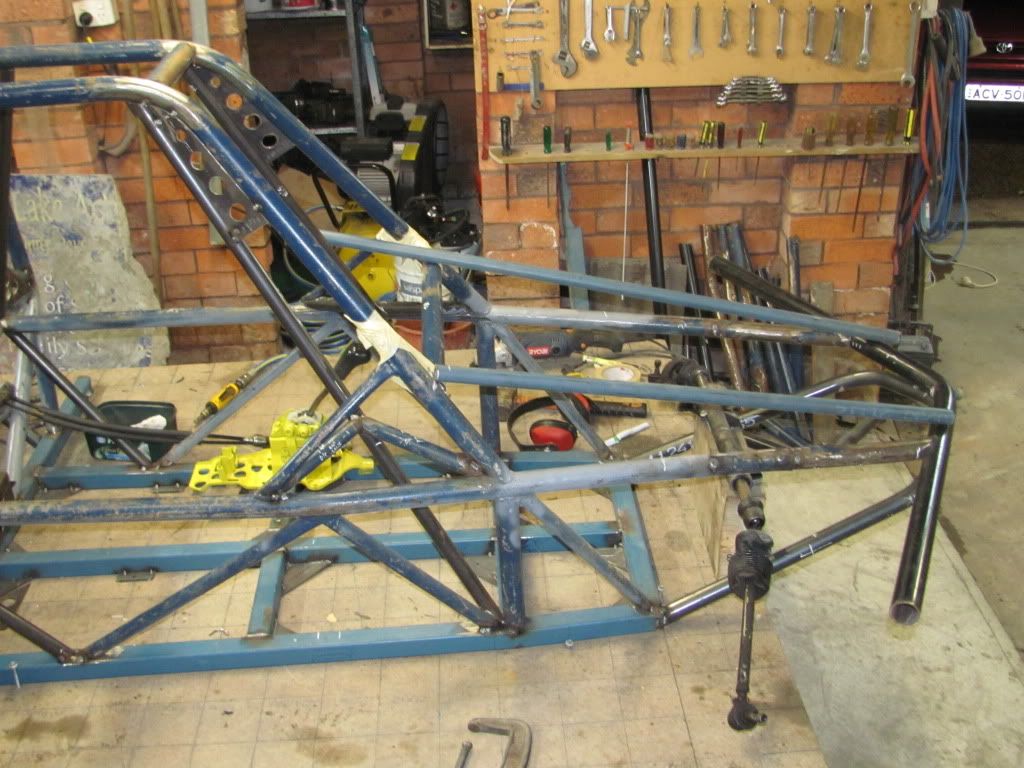
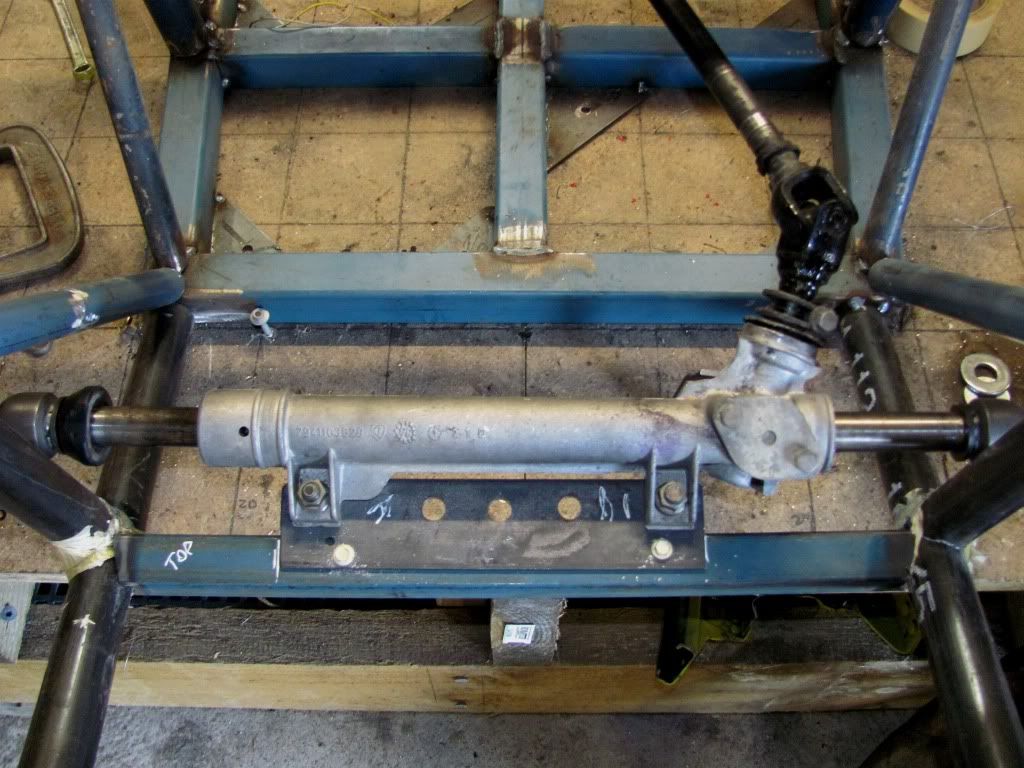
I had the rack & pinion temporarily screwed up high on a raised timber block, but when I started looking at cutting the cross bar to hold it I realised it needed to be almost on the bottom of the chassis, for two reasons. The steering arms on my RX7 series 7 front uprights are on the bottom of those hubs, plus the chassis bottom rail is rising at that point under the Rhino nose. So a bit of decent angle welded just above the skid plate should be all that’s needed to hold the steering gear in place. The positioning of the rack front to back was determined by putting it’s ends a distance equal to the length of the steering arms.
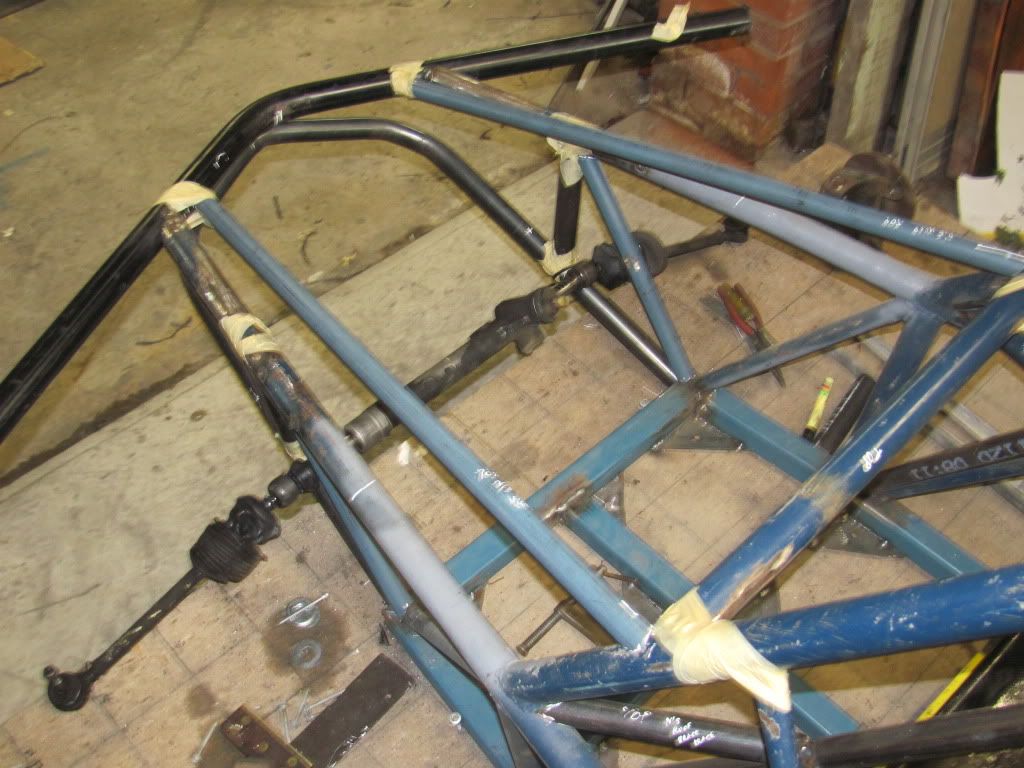
The two new short uprights I added into the side of the front framing are the vertical line at which the front of the top and bottom front inner wishbones will be mounted. Having an upright at that point adds strength exactly where it’s really needed, and gives me some flexibility if I need to mount either pivot point off the main top or bottom chassis rails. The diagonal going back down from the top of it completes the new front end tie in.
|
|
| Back to top |
|
|
Redliner
Just got MTs
Joined: 22 Dec 2011
Odometer: 172
|
| Posted: Sat Feb 11, 2012 9:21 am Post subject:
|
|
|
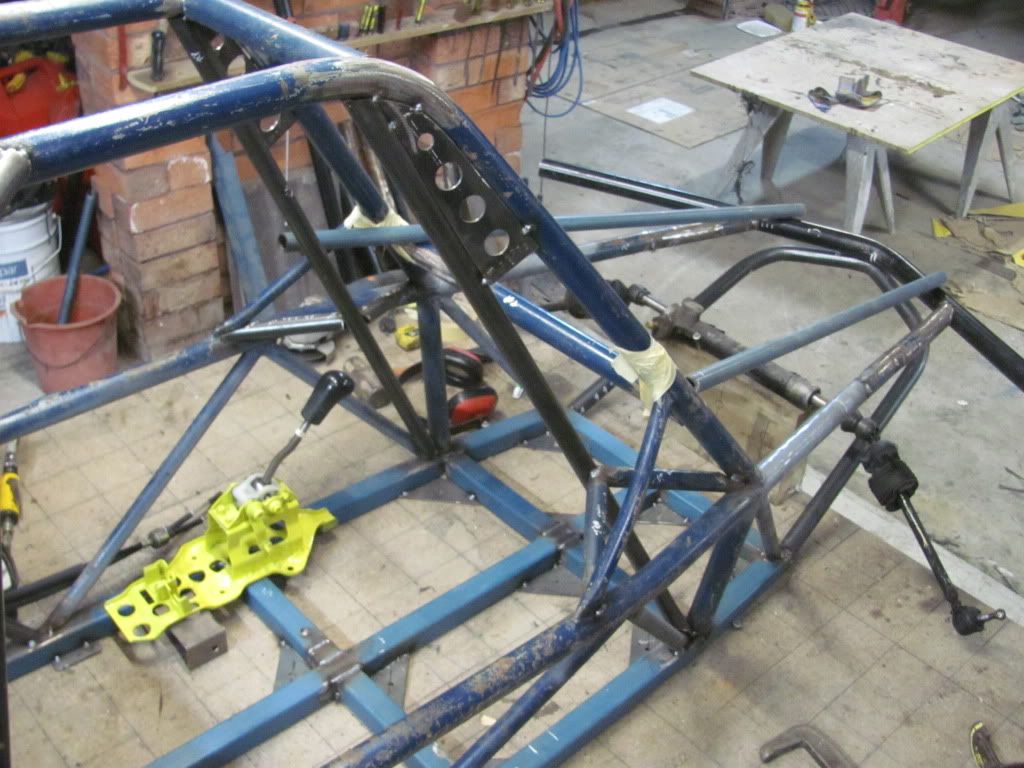
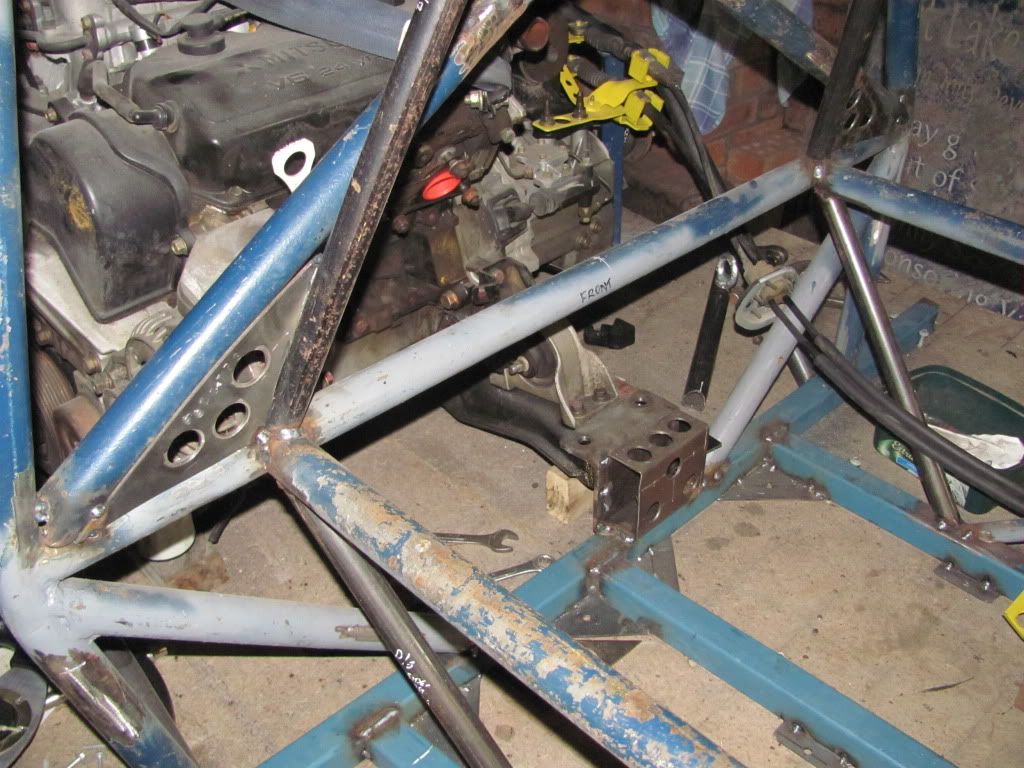
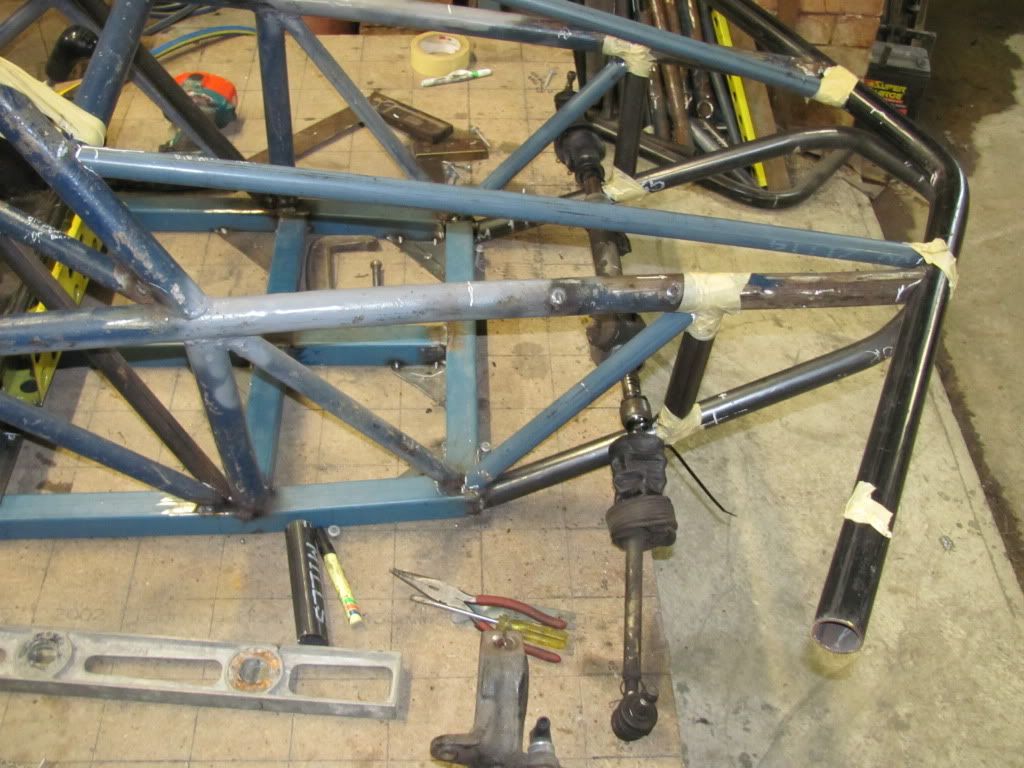
Having the front frame tacked together has allowed me to start cutting the pieces that will hold the steering rack and column. Room had to be left around the rack ends to ensure the tie rods won’t hit the frame as the suspension rides up and down. Dave made a great suggestion from his speedway experience – put steel straps right around the rack body rather than just rely on the alloy brackets on it to hold it under the high stresses of racing. I intend heeding his advice. Meantime I screwed and taped the bars I cut in place.
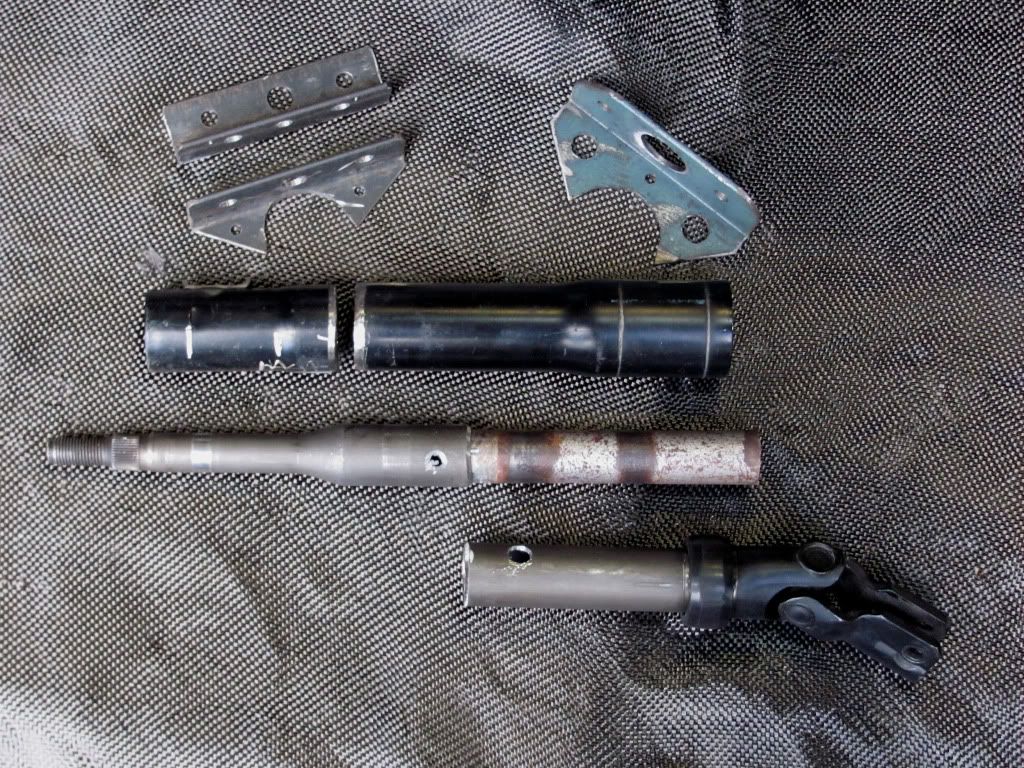
When I tried the steering column that came with the rack I found it too long. I couldn’t shorten the rod between the rack and the column as this would have made the angles too sharp. Instead, I shortened the column itself, which came apart and lended itself to this reduction. I also had to cut off the factory mounting brackets for it and make new ones. Here’s all the pieces ready to go to my TIG welding son, but I might change the top of the shaft to a Honda one if Dave has a spare, as it is proving difficult to obtain a Boss steering wheel mounting kit for this Renault shaft.
This third pic shows how I’ve now mounted the seat without the Magna runners, and how I’ve been just able to squeeze in the factory gear changer with a bit of a nick & tuck.
|
|
| Back to top |
|
|
Redliner
Just got MTs
Joined: 22 Dec 2011
Odometer: 172
|
| Posted: Wed Mar 07, 2012 7:55 pm Post subject:
|
|
|
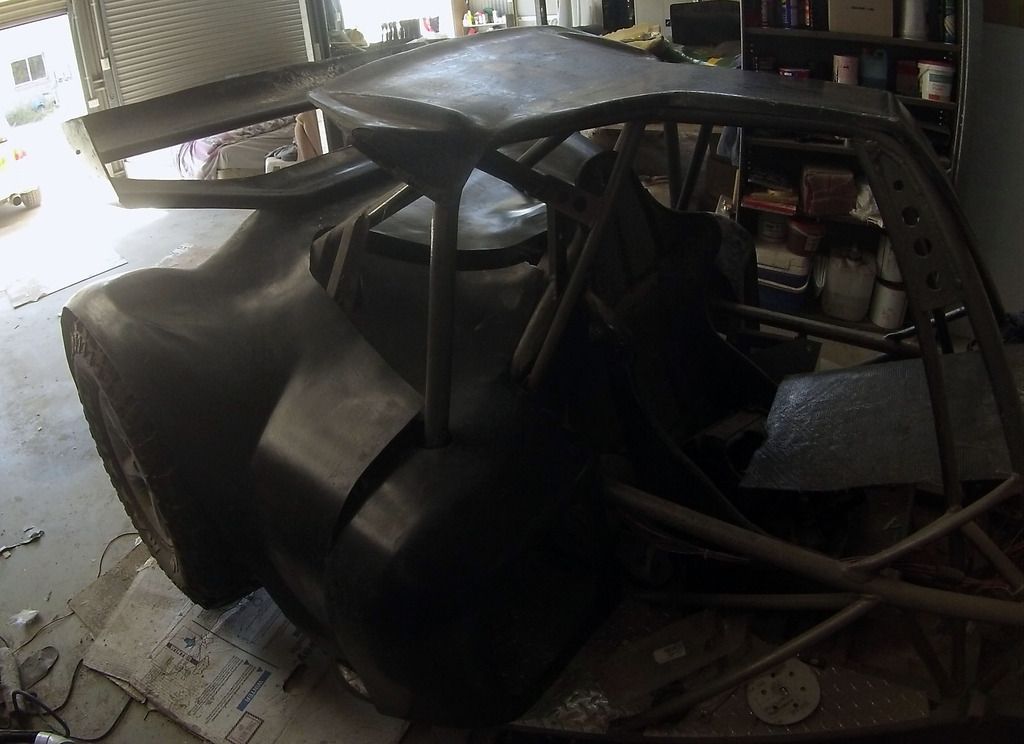
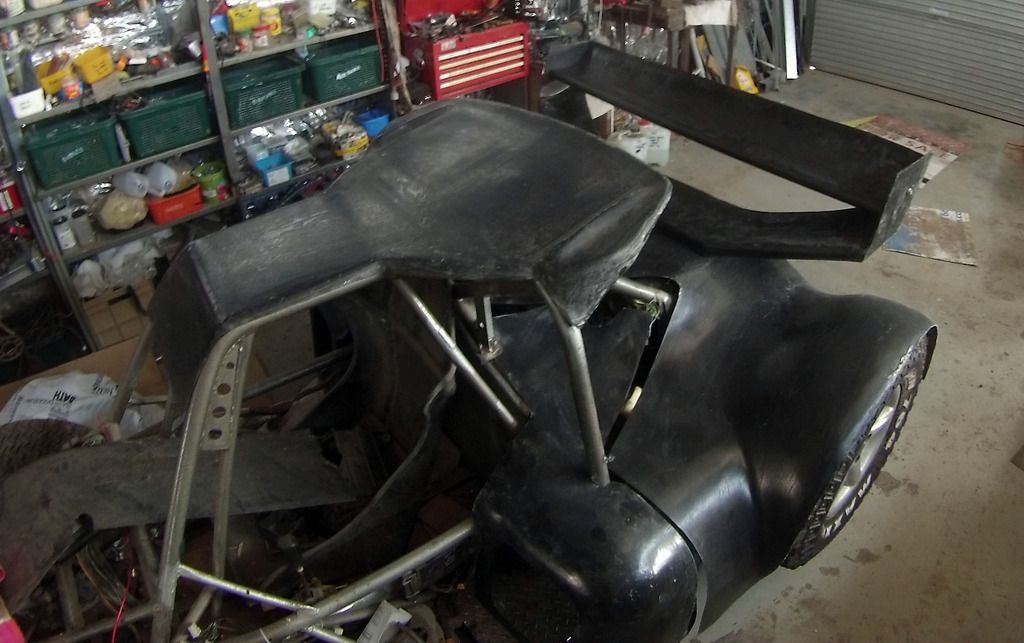
I've made a start on the carbon fibre body work.... and I think this buggy is gonna look spectacular:
http://youtu.be/JMPkk6UHY-Y
|
|
| Back to top |
|
|
Redliner
Just got MTs
Joined: 22 Dec 2011
Odometer: 172
|
| Posted: Tue Mar 13, 2012 10:01 pm Post subject:
|
|
|
In this next stage on my continuing offroad buggy build I make a custom bonnet from scratch out of carbon fibre, which could also be made out of fibreglass:
http://www.youtube.com/watch?v=KCPxwIL4MXA
|
|
| Back to top |
|
|
Redliner
Just got MTs
Joined: 22 Dec 2011
Odometer: 172
|
| Posted: Fri Mar 16, 2012 12:41 pm Post subject:
|
|
|
Part 1 of my V6 Mid engined buggy build - getting the donor car and making the chassis
http://youtu.be/jCzZmfM_aAQ
|
|
| Back to top |
|
|
350 Vortec
Just got MTs

Joined: 22 Mar 2011
Odometer: 169
Location: Ireland,East
1998 Nissan patrol
|
| Posted: Fri Mar 16, 2012 7:34 pm Post subject:
|
|
|
| Thanks for all the effort making/showing this Redliner,your enthusiasm is fantastic(sorry to hear your buddy's welder was stolen)
|
|
| Back to top |
|
|
4x4rick
Off-Road Guru

Joined: 06 Dec 2007
Odometer: 1900
Location: J25 M25
|
| Posted: Sun Mar 18, 2012 3:43 pm Post subject:
|
|
|
respect...
__________________________________
Most sports require only one ball -our sport require's two..........
.........................................................................
DCJC member |
|
| Back to top |
|
|
Redliner
Just got MTs
Joined: 22 Dec 2011
Odometer: 172
|
|
| Back to top |
|
|
Redliner
Just got MTs
Joined: 22 Dec 2011
Odometer: 172
|
|
| Back to top |
|
|
|
|
Redliner
Just got MTs
Joined: 22 Dec 2011
Odometer: 172
|
|
| Back to top |
|
|
Redliner
Just got MTs
Joined: 22 Dec 2011
Odometer: 172
|
|
| Back to top |
|
|
Redliner
Just got MTs
Joined: 22 Dec 2011
Odometer: 172
|
|
| Back to top |
|
|
simonallen
Off-Road Guru

Joined: 05 Jan 2006
Odometer: 1019
Location: In the s**t most of the time...
1997 Lada Niva
|
| Posted: Tue Jan 08, 2013 8:22 pm Post subject:
|
|
|
| are those hubs upside down?
|
|
| Back to top |
|
|
Redliner
Just got MTs
Joined: 22 Dec 2011
Odometer: 172
|
|
| Back to top |
|
|
Redliner
Just got MTs
Joined: 22 Dec 2011
Odometer: 172
|
|
| Back to top |
|
|
Toseland
Mud Obsessed

Joined: 25 Oct 2011
Odometer: 3209
Location: cardiff
1999 Suzuki Vitara
|
| Posted: Sun Mar 17, 2013 9:50 am Post subject:
|
|
|
looks stunning....
what you needed was 30 slaves as well, the egyptions found that more effective..
what you should have said is "i have found that, with 30 slaves you can move anything"..
oh, and i would check the toe in angle at 9:15 
__________________________________
I live by 2 sayings:
1. The beatings will continue until morale improves
2. Pain is just Weakness leaving the body..
The feeling you get when you first smash your shaft out, is one you will never forget.. especially if you do it in front of 10 guys. |
|
| Back to top |
|
|
Redliner
Just got MTs
Joined: 22 Dec 2011
Odometer: 172
|
| Posted: Wed Apr 10, 2013 8:36 am Post subject:
|
|
|
I've struck a fabrication issue I don't know how to solve, given there is so little scratch building here in Australia of genuine long travel buggy suspension. My problem is this: What do I use for the ball joints where the steering arms mount to the arms on the factory hub? When I mount factory steering ball joint ends on the arms they won't swivel enough to cover the angles the suspension travels through. I've tried Heim joints horizontally there, but they have the same problem... not enough movement. So can you experienced builders help me with pictures (worth ... y'know), and advice?
The other issue I've got is that the steering arms on the RX7 hubs I'm using are very low on the hub, so low that my rack arms wouldn't clear my chassis on full lock at full droop. So I want to instead mount the steering arms to the TOP side of the hub arms, rather than underneath them like Mazda does. With my hubs the right way up this means that the tie rod end hole taper is up the wrong way for a tie rod end to bolt in from the top. I presume this means I need to remove the taper by drilling out the hub arm holes and using just normal, straight bolts instead? Or is there a better way?
All advice would be appreciated. And pics.. PLEASE pics.
|
|
| Back to top |
|
|
parrotveasey81
Mud Obsessed

Joined: 13 Feb 2009
Odometer: 7480
Location: bradford on avon (wiltshire)
|
|
| Back to top |
|
|
Redliner
Just got MTs
Joined: 22 Dec 2011
Odometer: 172
|
|
| Back to top |
|
|
|
|
Redliner
Just got MTs
Joined: 22 Dec 2011
Odometer: 172
|
|
| Back to top |
|
|
Redliner
Just got MTs
Joined: 22 Dec 2011
Odometer: 172
|
|
| Back to top |
|
|
Redliner
Just got MTs
Joined: 22 Dec 2011
Odometer: 172
|
|
| Back to top |
|
|
Redliner
Just got MTs
Joined: 22 Dec 2011
Odometer: 172
|
|
| Back to top |
|
|
Redliner
Just got MTs
Joined: 22 Dec 2011
Odometer: 172
|
|
| Back to top |
|
|
Redliner
Just got MTs
Joined: 22 Dec 2011
Odometer: 172
|
|
| Back to top |
|
|
Redliner
Just got MTs
Joined: 22 Dec 2011
Odometer: 172
|
|
| Back to top |
|
|
Eclipsed4ever
Just got MTs
Joined: 05 May 2012
Odometer: 190
Location: Hereford
|
| Posted: Tue Mar 22, 2016 2:50 pm Post subject:
|
|
|
Can't wait to see this all together! 
__________________________________
2.2 Vtec 4WS Single Seater - aka Screamer - UK Champion 2013 + 2014
3.0lr V6 4WS - Screamer 2 - UK Champion 2015 + 2016 + 2017
Eurotrial 2nd in Prototype Class 2018
https://www.facebook.com/ScreamerOffroad |
|
| Back to top |
|
|
Redliner
Just got MTs
Joined: 22 Dec 2011
Odometer: 172
|
|
| Back to top |
|
|
Redliner
Just got MTs
Joined: 22 Dec 2011
Odometer: 172
|
| Posted: Mon Mar 28, 2016 1:44 am Post subject:
|
|
|
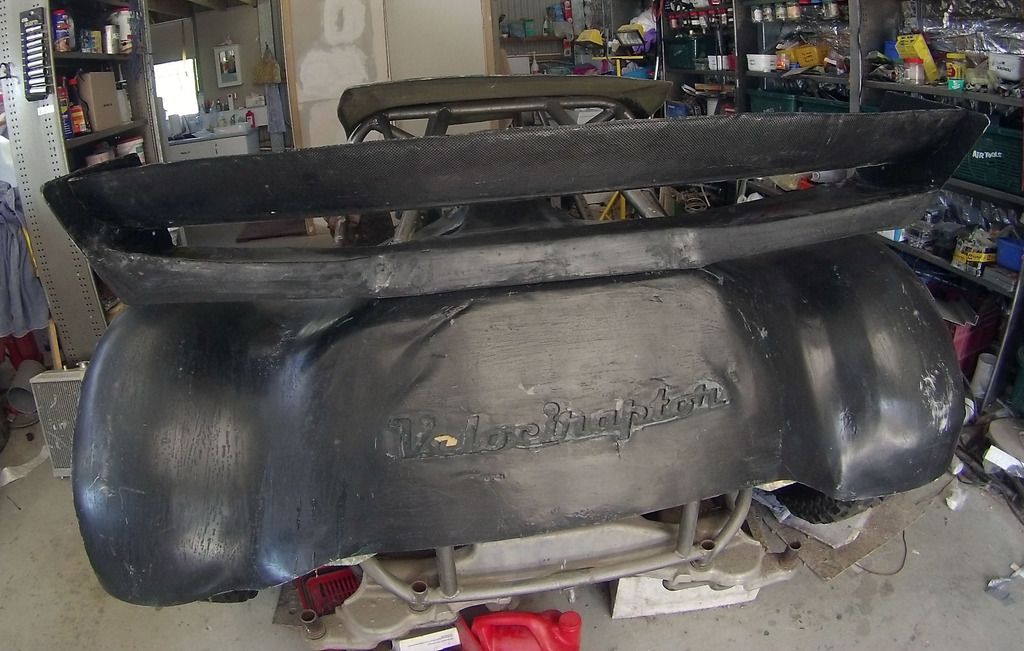
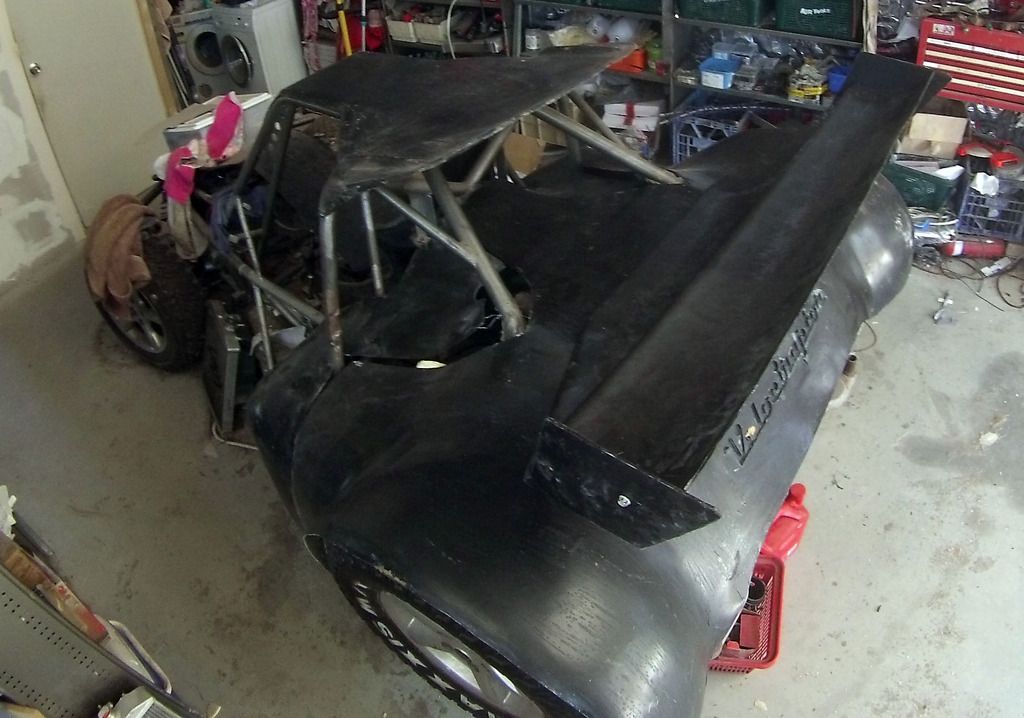
Starting to trim & fit the rear bodywork, which is coming together nicely with an appearance rather like the friggin' Batmobile! Please remember these are just raw panels straight out of the molds that need finishing off, and are not bolted in place but just roughly positioned.
|
|
| Back to top |
|
|
|
|
|


