| View previous topic :: View next topic |
| Author |
Message |
Tramp
Off-Road Guru

Joined: 16 May 2007
Odometer: 1745
Location: Rotherham
1992 Suzuki Samurai
|
 Posted: Wed Mar 16, 2011 3:49 pm Post subject: Replica SJ Posted: Wed Mar 16, 2011 3:49 pm Post subject: Replica SJ
|
 |
|
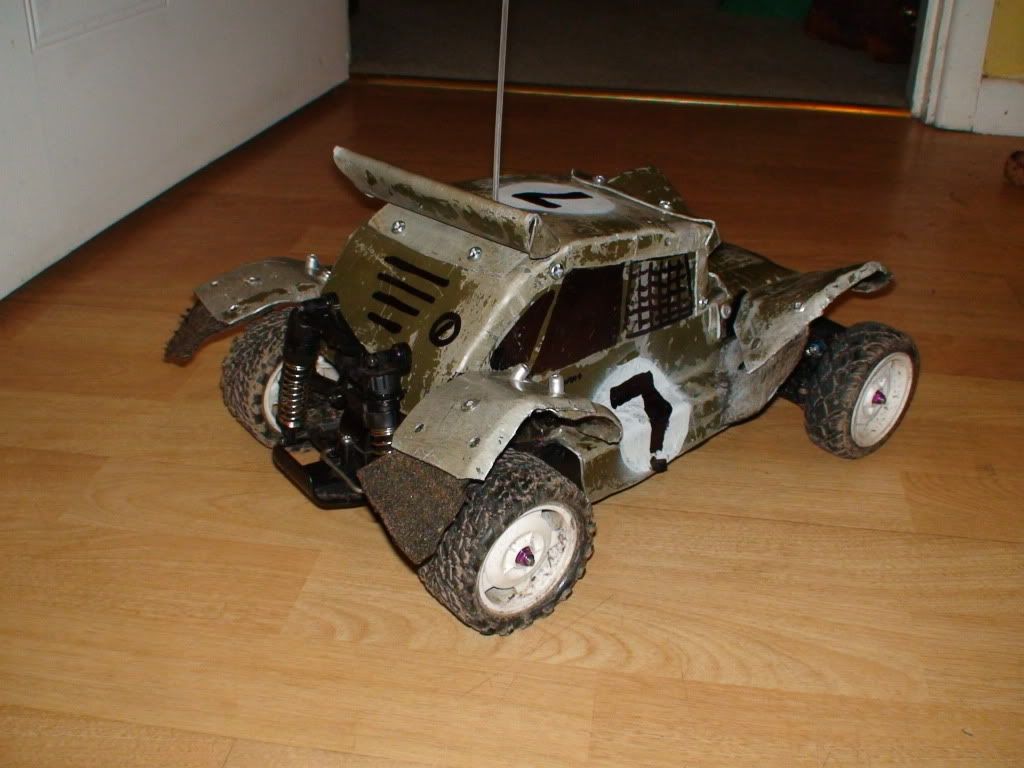
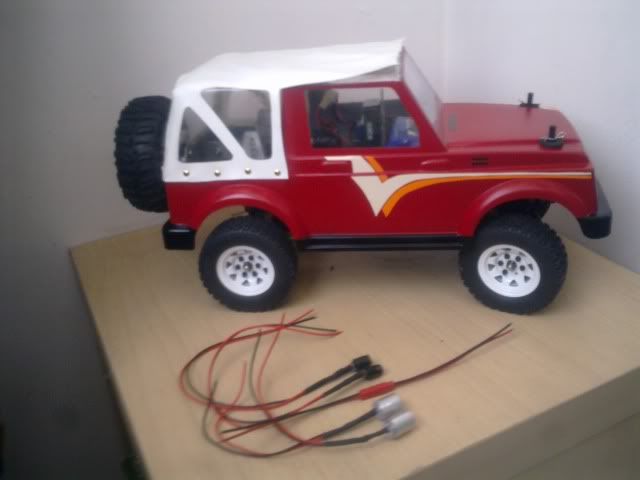
I'm trying to make a replica of my suzuki SJ it doesn't have to be exact but I'd like it to look similar enough to be easily identified as it

so any way I started with an MRC and a speedway pal samauri body

It took me a while to get started (as enjoyed driving the MRC around the living room to much  ) )
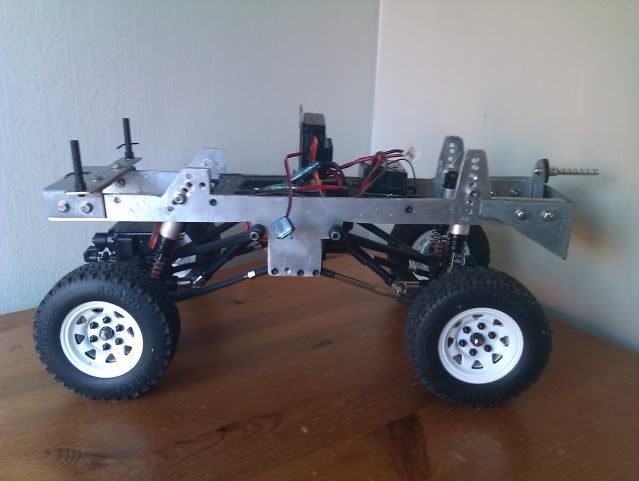
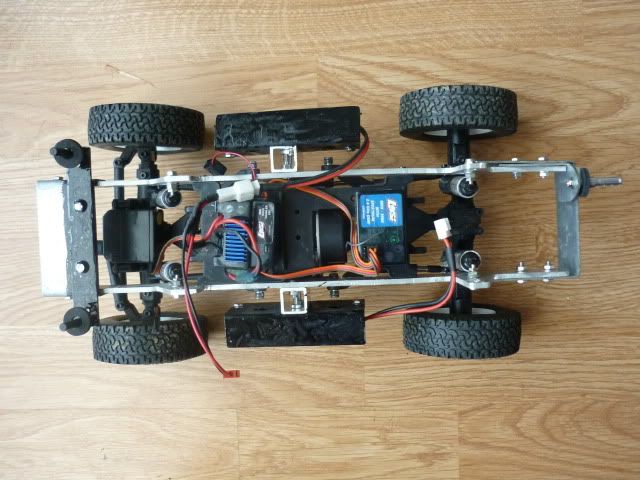
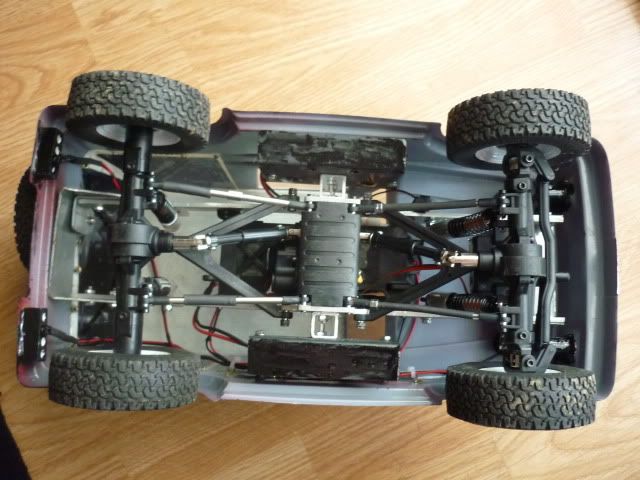
When I did get started, I started by making a chassis, I used 3mm aliminium (and cut it out with a hacksaw - felt like I had w*nkers cramp for a week!)


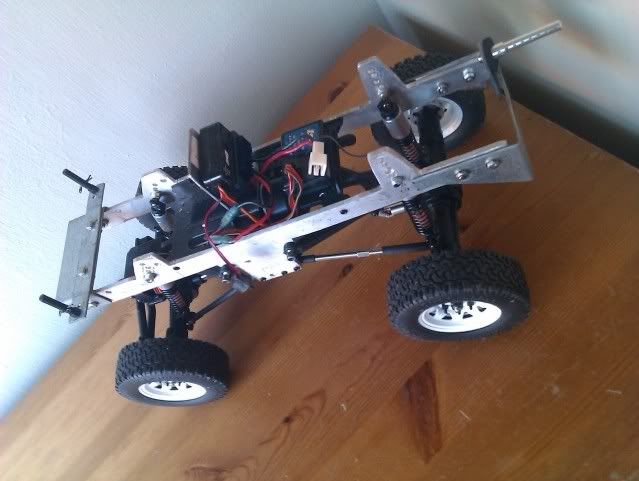
and the obligatory twist shot... (although it doesn't matter as its more about looking right)

On another forum I was requested to post the sketch I used to make the chassis, so If it helps some else out they are more than welcome to use it, I based most of the measurements on the original chassis

If I was to make the chassis again I would move the rear shock towers forward slightly, I lined the center of the tower up with the rear wheel center and it makes the shockers lean slightly backwards, next time I'd line the center of the tower up with the bottom eye of the shock mounting,
Also I angled the front shock absorbers back ward to allow the servo to still be mounted on the front axle, generally it clears the servo but at full extent the spring does touch, also I had to use 3mm nuts to spacer the top of the shockers out from the chassis
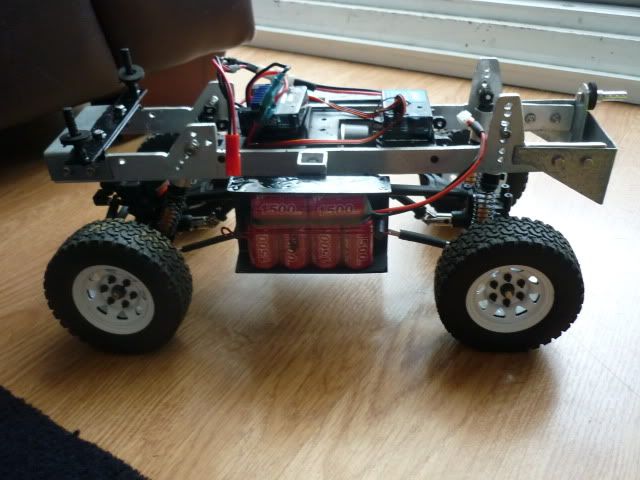
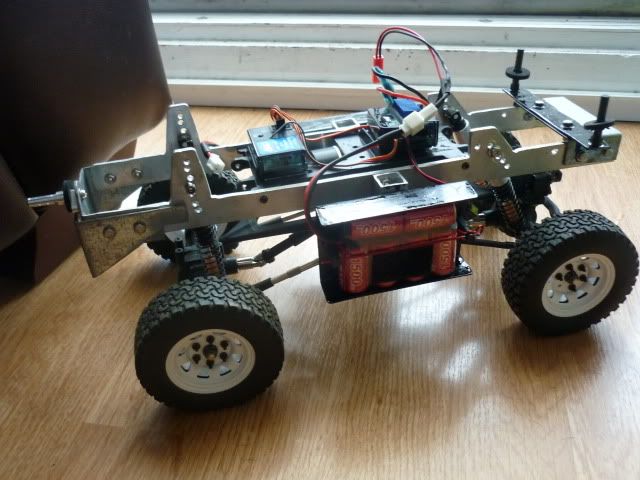
and then I just made a bracket to hold the battery and tiewrapped things down, although it was only a little thing it ment I could start running it around again, which was a highlight,


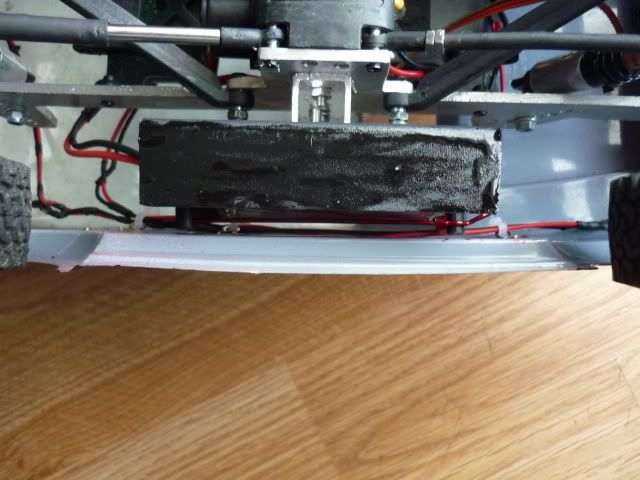
I had to raise the battery up quite high so that it wouldn't hit the servo on the front axle (while compressed) when I was using the highest shock settings. After a trial body fitting the battery was way to high, so I made a lower chassis 'bridge' and moved the battery and esc, I alos mounted the battery using self adhesive velcro so it can come off now, which means I can buy some more and swap them on the trail. I also got the dirt grabbers from rc4wd and fitted them although some how I manged to loose a nut and bolt from one of the beadlocks 
__________________________________
No Mud to Deep, No Hill to Steep!
http://www.suzukiclubuk.co.uk |
|
| Back to top |
|
 |
|
|
Tramp
Off-Road Guru
Joined: 16 May 2007
Odometer: 1745
Location: Rotherham
1992 Suzuki Samurai
|
| Posted: Wed Mar 16, 2011 3:51 pm Post subject:
|
|
|


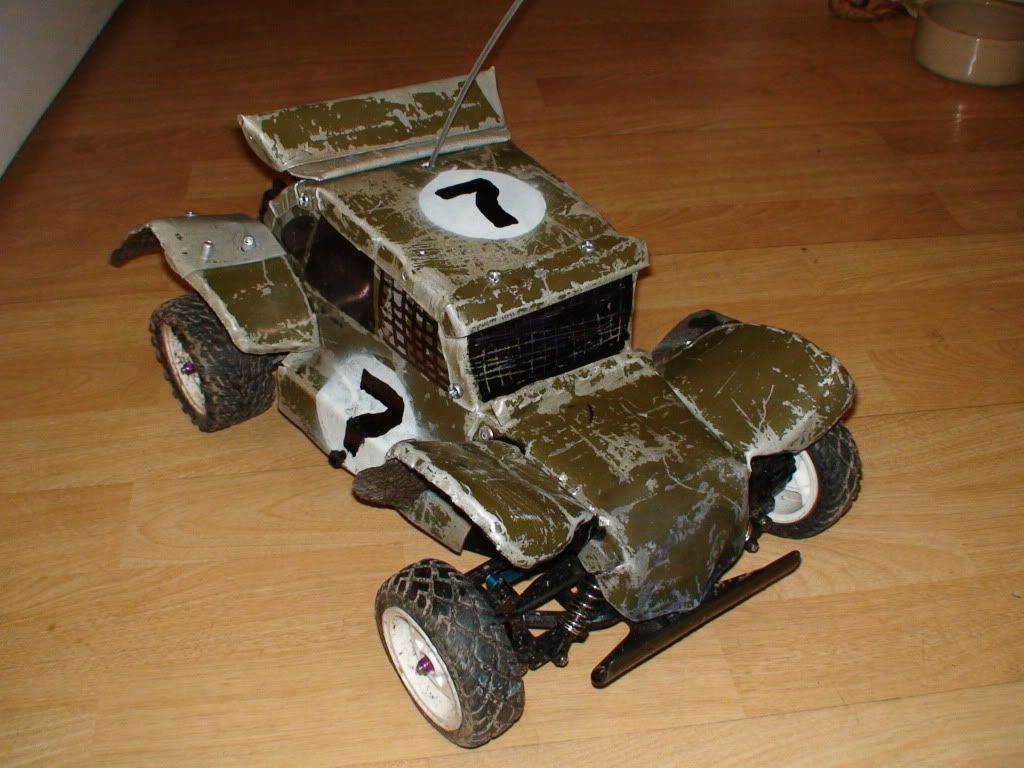
And with the body on


the body is great but the wheel base is a little to long for it, so I'm going to shorten the links for the front axle (and move the y piece further back) Im also struggling with too much articulation and the wheels binding on the body, I've just ordered some bits to make it stiffer and hopefully it should sort me out, I don't really want to post how much it has cost me so far but its a bloody expensive hobby!!!
__________________________________
No Mud to Deep, No Hill to Steep!
http://www.suzukiclubuk.co.uk |
|
| Back to top |
|
|
MATT01234
Just got MTs
Joined: 03 Jan 2009
Odometer: 147
Location: rotherham
|
| Posted: Wed Mar 16, 2011 10:52 pm Post subject:
|
|
|
| I'd move the 'y' links inside the chassis as they will move more freely and won't bind. You know you can or could when I was doing rc's get an leaf spring pack that was totally bolt on and worked pritty well. Rcbro's I think did them or someone like that. And your right itis expensive! I gave it up because I just couldn't spend the same money on smaller bit when they can be on my 1:1!
|
|
| Back to top |
|
|
Tramp
Off-Road Guru
Joined: 16 May 2007
Odometer: 1745
Location: Rotherham
1992 Suzuki Samurai
|
| Posted: Sat Mar 26, 2011 11:22 pm Post subject:
|
|
|
right then my bits arrived and I had a bit of spare time today to mess around with it, I put the new harder springs on followed by the fuel tube to limit the travel (thanks for the suggestion) then I was looking at it and it didn't seem right


So I decided to move the front axle back 5mm to get the wheelbase spot on
I took it to pieces moved the ylink mount on the chassisand started making up some new links


the old lower links were 7.8cm long the new threaded bar is 7.3cm I sleeved the bar in heat shrink (with out shrinking it) and put it back together


Although the body its better on the chassis now with no rubbing the wheelbase now looks a little short!!!! (which Im angry about) I think I'm getting alot of axle movement when im articulating as in one side the wheel base increases whilst on the other it decreases


I might see if I can do something about extending the rear links in the future
__________________________________
No Mud to Deep, No Hill to Steep!
http://www.suzukiclubuk.co.uk |
|
| Back to top |
|
|
MATT01234
Just got MTs
Joined: 03 Jan 2009
Odometer: 147
Location: rotherham
|
| Posted: Sun Mar 27, 2011 11:16 am Post subject:
|
|
|
Try moving the top 'y' link inside the chassis or leave the top where it is and move the bottom links outside the chassis 
|
|
| Back to top |
|
|
Twiss
Mud Obsessed

Joined: 18 Feb 2008
Odometer: 6438
Location: Birkirkara, Malta
1993 Suzuki Samurai
|
| Posted: Mon May 09, 2011 4:22 pm Post subject:
|
|
|
Hi Luke,
A random indonesian SJ fan I have on facebook posted these...
Thought you might find them interesting!


__________________________________
Twiss
'95 Samurai 416 16v
'92 Maruti Gypsy MG410
www.suzukiclubuk.co.uk |
|
| Back to top |
|
|
Tramp
Off-Road Guru
Joined: 16 May 2007
Odometer: 1745
Location: Rotherham
1992 Suzuki Samurai
|
| Posted: Mon May 16, 2011 5:45 pm Post subject:
|
|
|
cheers twiss that’s pretty cool!
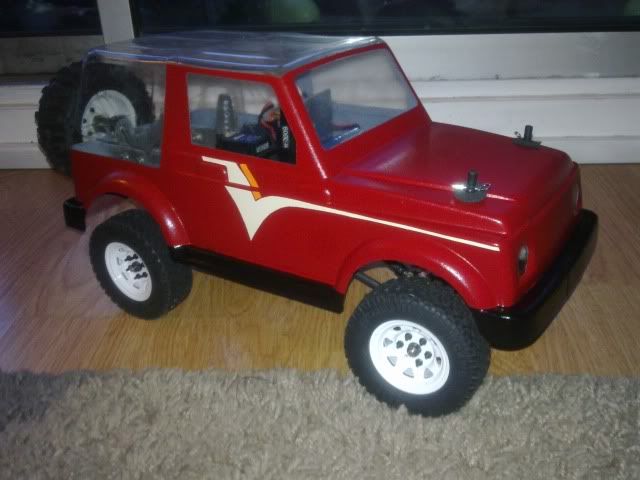
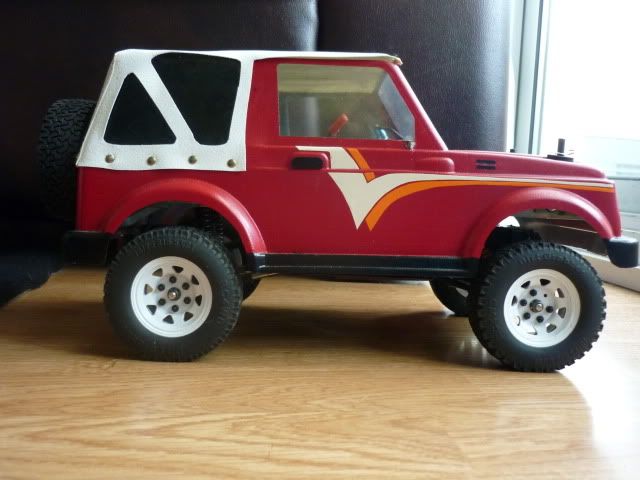
So.... I've not updated this in a while, I've had a play with linkages and I'm pretty happy now, so I decided to give it a lick of paint (I hate painting - it takes ages and its dead easy to mess it up) I decided to give it a single colour, I will add the decals later by cutting out self adhesive vinyl, Also I was worried about applying masking tape to the bits I've already done (as I don't want it pulling the paint off) so I'm probably going to free hand the bumpers, and the sill covers. I also bit the bullet, I didn’t want to use body posts but the velcro wasn't working out for me as the lexan body wasn't really hard enough so I used two, for the bonnet and one for the back (which also acts as a spare wheel carrier)
any way here are the pics,
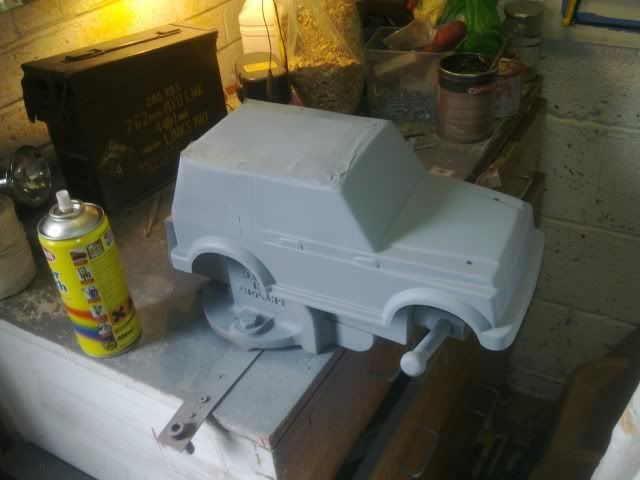
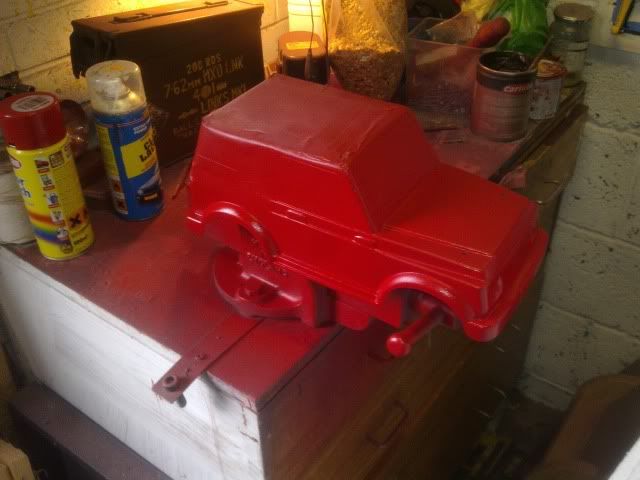

I've deliberately left the soft top paint free as I'm getting hold of some soft top material that I will glue on to it, Also you may have noticed the annoying bits around the head light bowls where the paint peeled off when I took the headlight stickers off, I have since touched them up but I was so annoyed when I noticed!!!
__________________________________
No Mud to Deep, No Hill to Steep!
http://www.suzukiclubuk.co.uk |
|
| Back to top |
|
|
TheClunk
Off-Road Guru

Joined: 26 Jan 2009
Odometer: 1159
Location: Chippenham
1997 Vauxhall Frontera
|
| Posted: Mon May 16, 2011 9:23 pm Post subject:
|
|
|
| You know with lexan shells you are supposed to paint them on the inside? It looks like you painted the outside. Sorry if I am teaching you to suck eggs here.
|
|
| Back to top |
|
|
MATT01234
Just got MTs
Joined: 03 Jan 2009
Odometer: 147
Location: rotherham
|
| Posted: Mon May 16, 2011 9:54 pm Post subject:
|
|
|
Please please please tell me you took the plastic film that is on the outside of the shell off 
|
|
| Back to top |
|
|
Redfourtrak ( neil )
Articulating

Joined: 26 Jul 2010
Odometer: 889
Location: east anglia/suffolk,essex border
|
| Posted: Mon May 16, 2011 10:47 pm Post subject:
|
|
|
doesnt an sj have leaf springs
__________________________________
I'm not stuck, the earth has just stopped spinning.....
www.bloodredoffroad.com
www.milneroffroad.com
youtube-redfourtrack |
|
| Back to top |
|
|
|
|
GVstu
Mud Obsessed

Joined: 05 Mar 2008
Odometer: 2314
Location: Northumberland
|
| Posted: Tue May 17, 2011 6:56 am Post subject:
|
|
|
| TheClunk wrote: | | You know with lexan shells you are supposed to paint them on the inside? It looks like you painted the outside. Sorry if I am teaching you to suck eggs here. |
It's "in vogue" at the moment to do the outside with several layers to simulate 'rock rash' scratches on the paint.
Cool little SJ, I should really get my trucks back up and running, they've taken a bit of a back seat with me constantly faffing with the 1:1 scale
__________________________________
He asked me if I'd seen a road with so much dust and sand; And I said, "Listen! I've traveled every road in this here land!" |
|
| Back to top |
|
|
Sman
Articulating

Joined: 21 Aug 2009
Odometer: 676
|
| Posted: Tue May 17, 2011 3:10 pm Post subject:
|
|
|
One time I did this....
Tamiya DF-02
Citroen 2cv rally body.
Cardboard template/prototype
Aluminium shell made from a bit of landrover panel With roof felt for mud flaps
I'm thinking about making a sammy chassis or somthing similar using 10mm copper tube braized together, I tried making a test chassis for some childs rc toy parts I got off my nephew and it worked ok.
__________________________________
Zombie Disposal Unit |
|
| Back to top |
|
|
Tramp
Off-Road Guru
Joined: 16 May 2007
Odometer: 1745
Location: Rotherham
1992 Suzuki Samurai
|
| Posted: Wed May 18, 2011 8:45 am Post subject:
|
|
|
| TheClunk wrote: | | You know with lexan shells you are supposed to paint them on the inside? It looks like you painted the outside. Sorry if I am teaching you to suck eggs here. |
As pajeroStu said I’m following the trend... it should scratch nicely. There are few other reasons I wanted to paint it on the outside, the first being my original method of mounting was self adhesive velcro on the inside of the body, the velcro sticks to the paint really well and was liable to pull it off, secondly the paint I wanted to use was automotive car paint (which I use when I touch up the SJ) to use this paint I needed to primer the surface first, If you paint the inside you have to lay down the colour first then apply a matt finish so It wouldn't have taken properly
| MATT01234 wrote: | | Please please please tell me you took the plastic film that is on the outside of the shell off |
I did! I was a bit worried about doing that, but I remembered I also keyed the lexan shell with wet and dry to give the primer something to stick to
| Redfourtrak ( neil ) wrote: | | doesnt an sj have leaf springs |
They do, But Its not a true scaler just more of a representation, most SJ's I know have metal bodies too! I thought about using leaf springs but to make them work properly you need weight, and this project is only a little light one
__________________________________
No Mud to Deep, No Hill to Steep!
http://www.suzukiclubuk.co.uk |
|
| Back to top |
|
|
Tramp
Off-Road Guru
Joined: 16 May 2007
Odometer: 1745
Location: Rotherham
1992 Suzuki Samurai
|
| Posted: Wed May 18, 2011 9:19 pm Post subject:
|
|
|
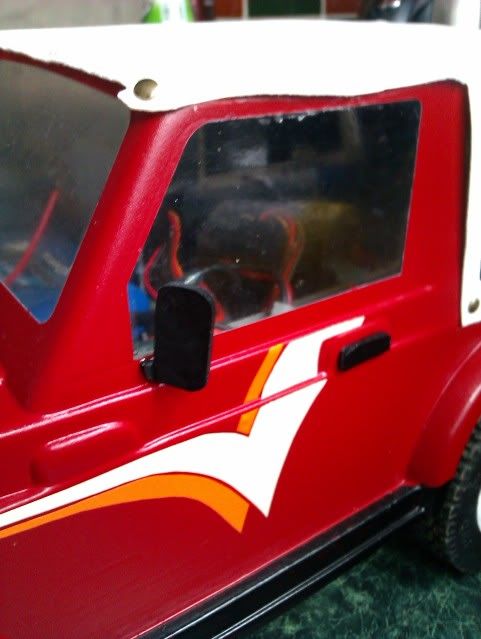
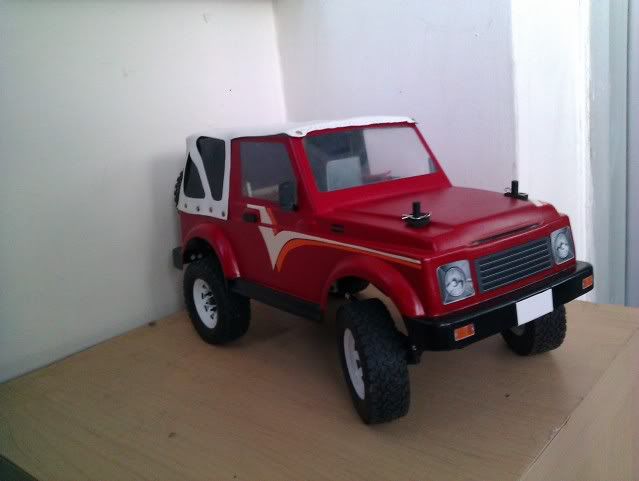
I did a bit more on this today, I painted the bumpers (although my masking wasn't fantastic and some seeped) :@ and the self adhesive vinyl came so I started on the decals, I'm sorry the pictures are bad I took them off my phone,

I’ve still got to finish the decals, and make some door handles and hinges and bits,get some soft top material and fit some lights (I’ve got most of the bits I need for them) its all coming together nicely now though
__________________________________
No Mud to Deep, No Hill to Steep!
http://www.suzukiclubuk.co.uk |
|
| Back to top |
|
|
Tramp
Off-Road Guru
Joined: 16 May 2007
Odometer: 1745
Location: Rotherham
1992 Suzuki Samurai
|
| Posted: Sun May 22, 2011 7:11 pm Post subject:
|
|
|
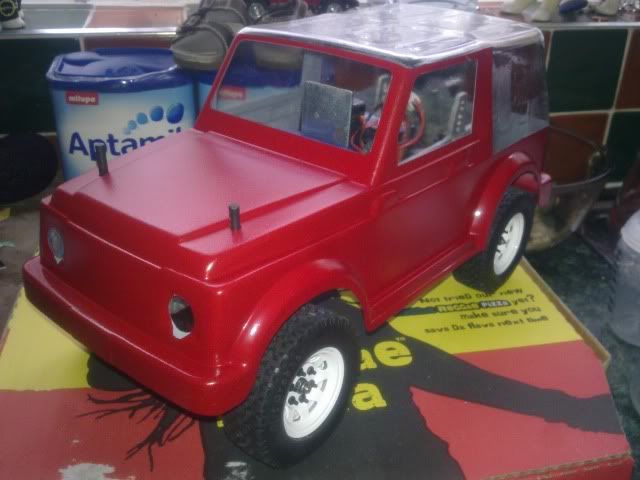
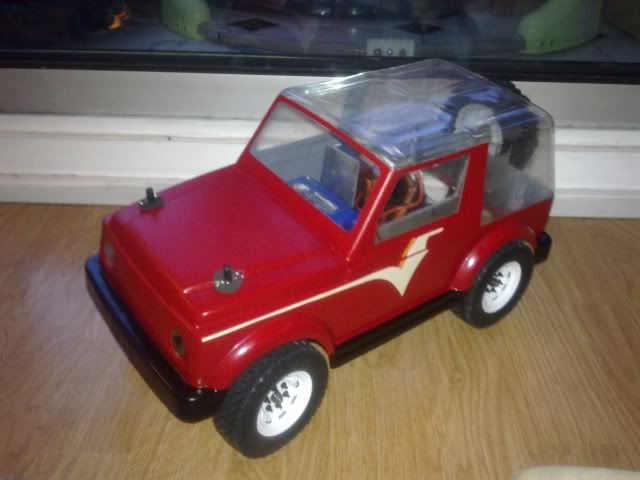
Done a bit more (not much though!) I just finished the decals on the side (and bonnet) and stuck on some of the stickers that came with the kit,
I've still got lots more to do, but it is progressing
__________________________________
No Mud to Deep, No Hill to Steep!
http://www.suzukiclubuk.co.uk |
|
| Back to top |
|
|
Tramp
Off-Road Guru
Joined: 16 May 2007
Odometer: 1745
Location: Rotherham
1992 Suzuki Samurai
|
| Posted: Sun Jun 12, 2011 3:27 pm Post subject:
|
|
|
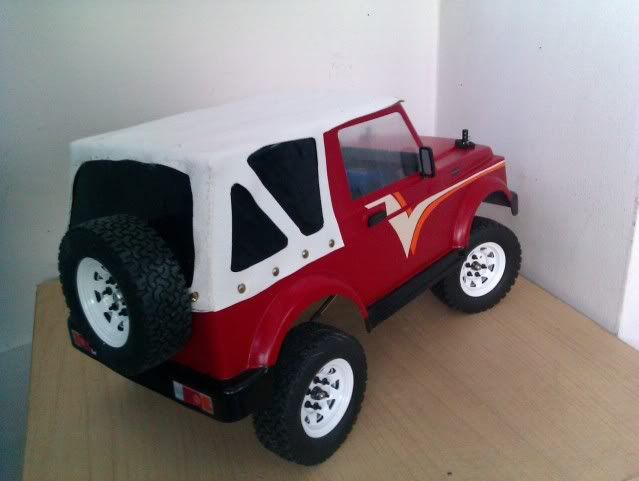
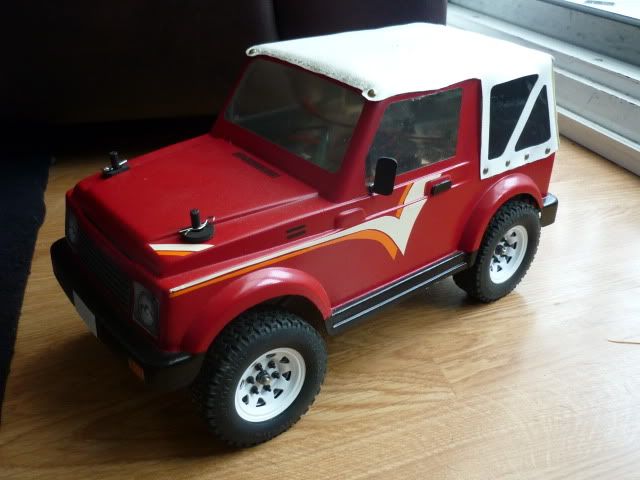
I've done a bit more (I know I should have been working on the real one but its raining and effin horrible out) Id had a go at making a soft top already but it was a little bit short on one side where I cut to much off, I thought I might be able to stretch it but it pulled another bit out of line, so I used it as a template to make my new one, I also decided to make some overlap pieces which I could so and so I wouldn't have to rely on glue to hold the sides together. The one on the right is my old one...
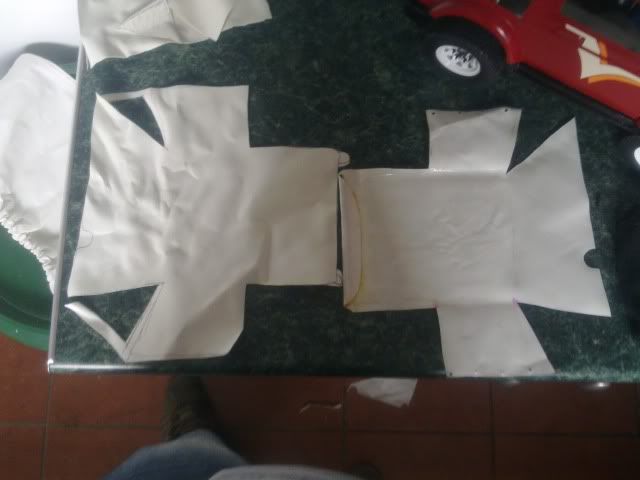
here is it sowed up and fitted, I used little bras rivets to hold it to the body (the type they use on jeans) I was going to rivet them but I think I need some small 2mm washers before I rivet it on properly
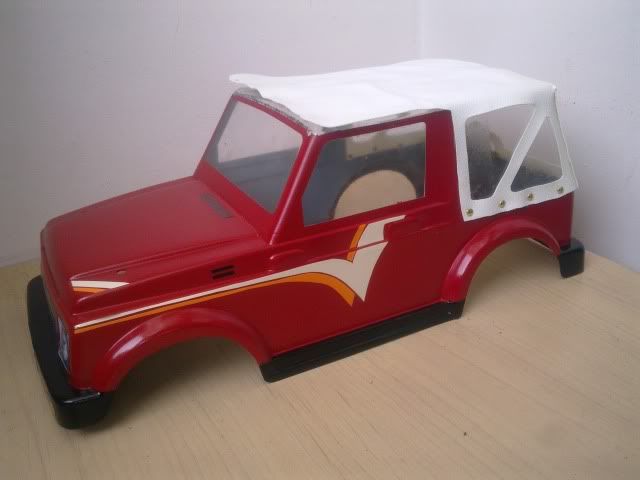
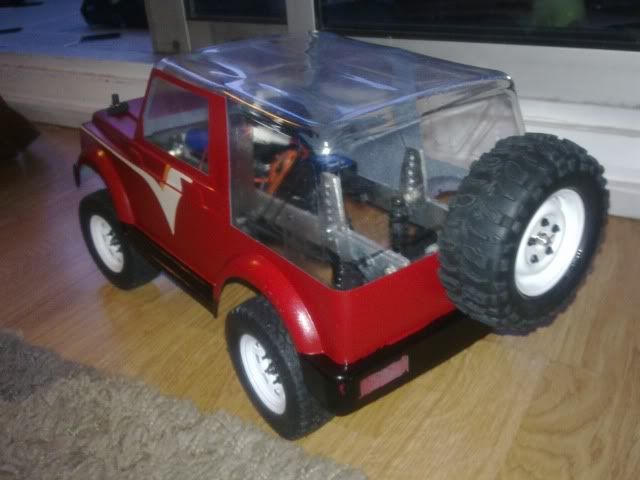
I fitted the body back on to the chassis, Its coming along nicely but still needs some work
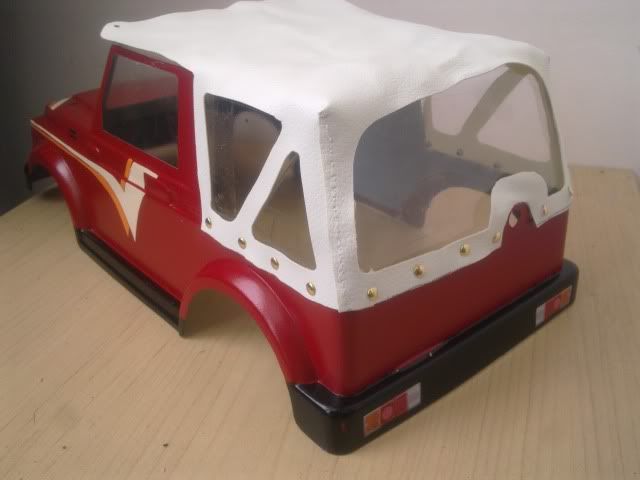
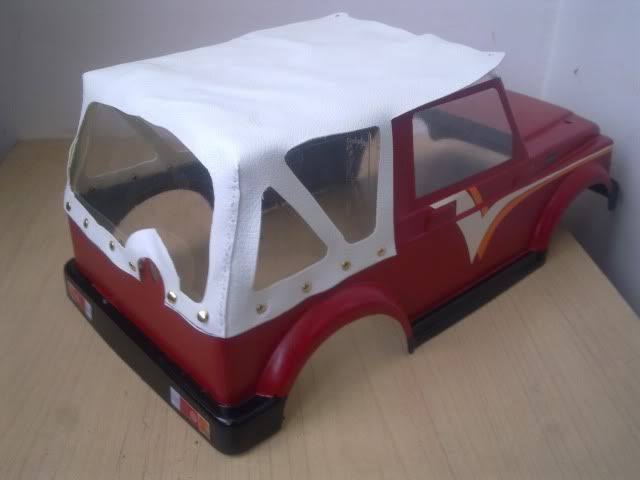
I used a hot pin to puncture the body along the roof line above the windscreen, after I've added the window tint to the back windows I'm going to sow the front of the roof directly to the body to stop it lifting in the middle, I'm also not very happy with the spare wheel, Its far to big, but I don't want to be spending money on another set of wheels from rc4wd just to use one as a spare, at the moment it has a plastic landrover rim with a standard mrc tyre fitted,
I've still got the Lights to fit (I’m just going to Araldite the led's to the inside of the body) Door handles, Windscreen wipers, Hinges, Spotlights and rear number plate to start, I've also got to buy them 2mm washers for the rivets and See if I can beg borrow or steal some window tint from somewhere As I refuse to buy a full roll!
__________________________________
No Mud to Deep, No Hill to Steep!
http://www.suzukiclubuk.co.uk |
|
| Back to top |
|
|
muddymesser
Mud Obsessed

Joined: 17 Jun 2008
Odometer: 7819
Location: preston
|
| Posted: Fri Jun 17, 2011 10:12 am Post subject:
|
|
|
can you make one for me next 
for the window tint what about using the tinting spary you can get for tail lights on cars . . . got to be cheaper and easier than film
__________________________________
http://suzukiclubuk.co.uk/forum1
Sign It Now
stickers and graphics made to order |
|
| Back to top |
|
|
cynic-al
Mud Obsessed

Joined: 14 Nov 2006
Odometer: 6062
Location: scunthorpe
1989 Suzuki SJ
|
| Posted: Mon Jun 20, 2011 12:02 pm Post subject:
|
|
|
That looks great
Only concern I would have is that when I was into RC normal car paint didn't always flex well enough and would sometimes chip off if the body flexed a lot. Although I only had a problem with this on a Nitro MG that I had which was uprated more than my driving skills
__________________________________
I know enough to be dangerous. |
|
| Back to top |
|
|
nivapilot
Guest
|
| Posted: Mon Jun 20, 2011 6:16 pm Post subject:
|
|
|
| I reckon that really looks the bees nees..well done that man.
|
|
| Back to top |
|
|
Tramp
Off-Road Guru
Joined: 16 May 2007
Odometer: 1745
Location: Rotherham
1992 Suzuki Samurai
|
| Posted: Sat Nov 12, 2011 3:31 pm Post subject:
|
|
|
So I've not updated this thread in a while, I thought I'd show you how I'm getting on.
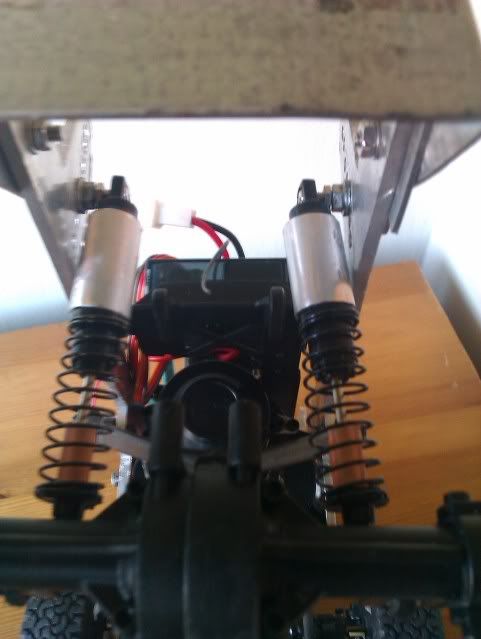
One problem was still far to much flex, and some torque twist from the drive line, I tried correcting this using the standard plastic spacers that came with the shockers but there wasn't really enough, so I made 4 identical spacers to push the springs down and the suspension harder, I didn't make the spacers full length as only going 4/5ths of the way allows me to put extra spacers in to correct the torque twist. I don't think torque twist should be such an issue now because by tightening everything up the suspension isn't as forgiving,
here's the chassis with the spacers
and the springs and spacers, I used a bit of tubing I had laying around, luckily the inside diameter was spot on!
And the obligatory Twist shot, This is as much articulation as it has... Which is spot on! In the end the suspension is restricted by the spring spacers and rubber fuel line on the piston rod,
I don't like the spare wheel but it was the best I could do (1.9 landrover rim with an original MRC tyre) but it is way to big for what I want, Ideally I'd like another metal rim with a dirt grabber (so they all matched) But I don't want to pay for a set of 4 rims and some tyres for a wheel that I'm not even going to use! I'm sort of hoping some one else who has used these wheels and tyres will feel the same way about a spare and a buy a set then sell me one! Other than That I'm keeping my eyes out for a children's toy with similar sized wheels that I could use,
I put the body back on and glued on the door handles, I made a start on the wing mirrors too

It still sits a little high at the front. Also Its still getting some torque twist.
I fitted a wing mirror, i was going to fit both but I'd not made them handed! do'h so i fitted one and altered the other,
then I set about the lights, I had some tube which i used for the front lights
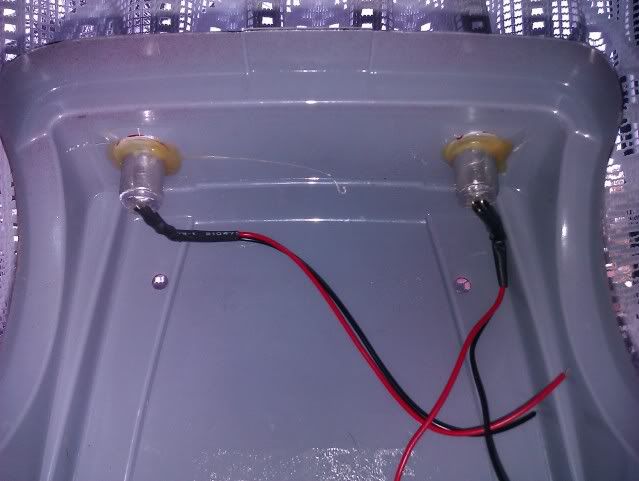
but the back lights were more difficult, I wasn't sure what lights I'd want to put in in the future. At the moment i just want plain red tail lights but I had to make the holder capable of taking all the ones I might need,
__________________________________
No Mud to Deep, No Hill to Steep!
http://www.suzukiclubuk.co.uk |
|
| Back to top |
|
|
|
|
Tramp
Off-Road Guru
Joined: 16 May 2007
Odometer: 1745
Location: Rotherham
1992 Suzuki Samurai
|
| Posted: Sat Nov 12, 2011 3:33 pm Post subject:
|
|
|
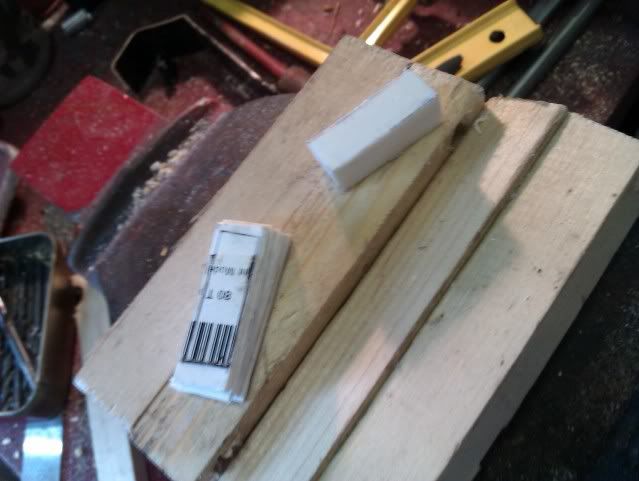
I started by gluing sheets of styrene together to give me a depth more than an led, I then trimed down the sheets to make them right (3cmx1cm)
I then drilled them for the x4 possible led's I could fit
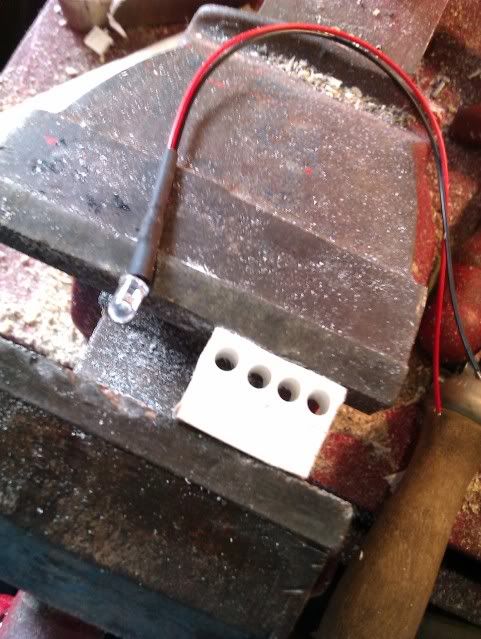
painted them black..
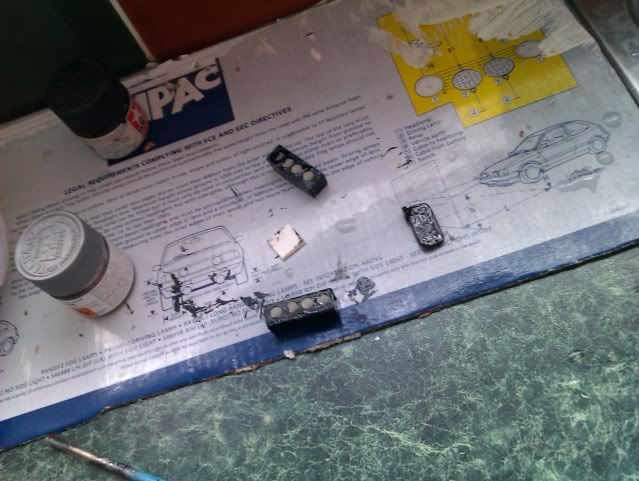
and then glued them in

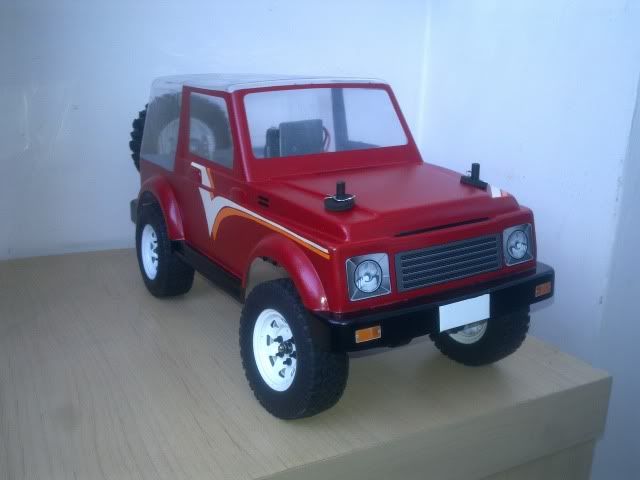
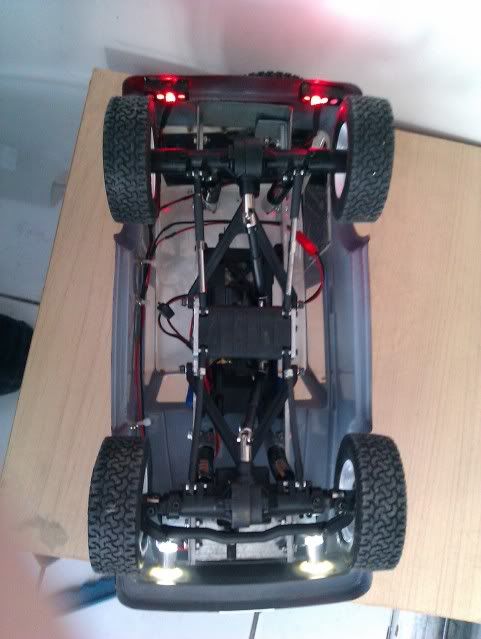
I wired the Led's and fitted a new spare wheel(RC4wd sell them singularly now) the new wheel fitting took around 10mins and I only had to drill the wheel centre out So it sat on the body post. I also had to shorten the body post (as the old spare was much wider) and make a new spacer to space the wheel from the body (I used a section of tube that was leftover from spacering my shock absorbers)
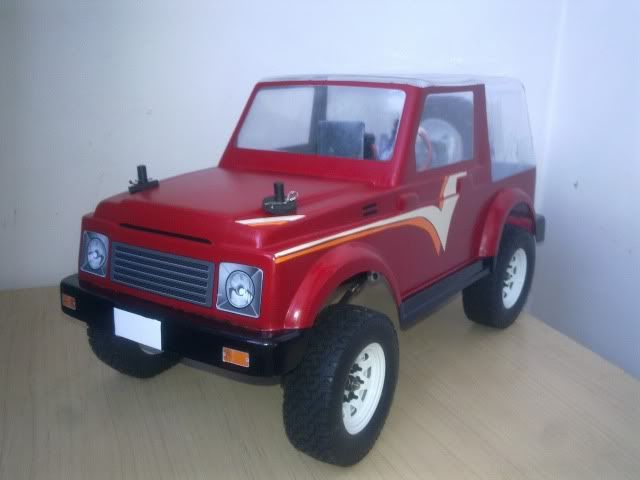
with the new spare wheel on, Its bob on, and I'm dead chuffed with the difference its made in appearance
And with the Led's on...
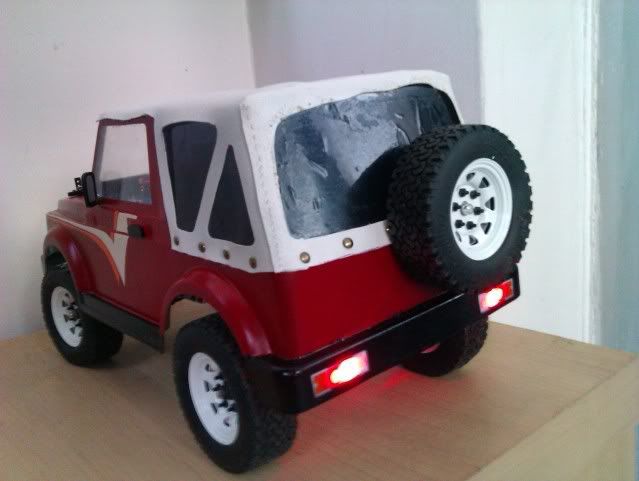
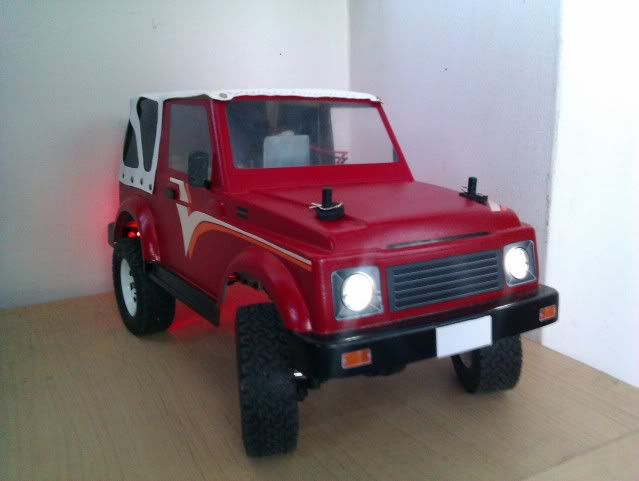
The front is missing sidelights (in the bumper) I'm tempted to make some up, but have been reluctant so far because the stickers that came with the kit are made up with orange (and look like an indicator)
and from underneath, you can see the wires running down the left hand side of the body
and I finally did a video

I'm sorry its not very exciting (and just in my back garden) I'd like to get down the woods with it one day, but we will see, generally its dark when I get in from work!
__________________________________
No Mud to Deep, No Hill to Steep!
http://www.suzukiclubuk.co.uk |
|
| Back to top |
|
|
Tramp
Off-Road Guru
Joined: 16 May 2007
Odometer: 1745
Location: Rotherham
1992 Suzuki Samurai
|
| Posted: Wed Feb 29, 2012 10:01 pm Post subject:
|
|
|
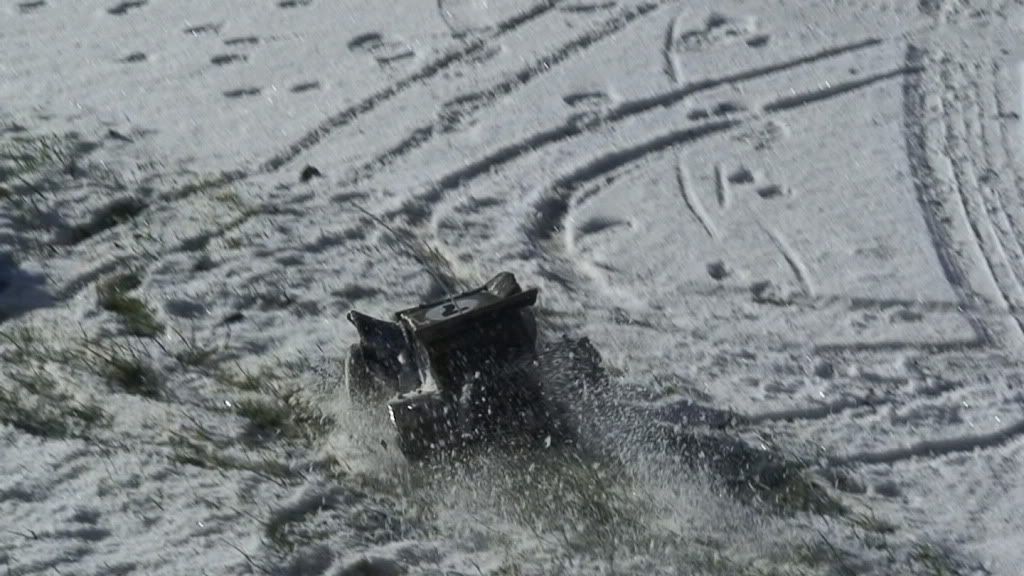
I finally got out in the woods with the SJ and camera
I didn't get many pics but got a few videos (if they upload!)
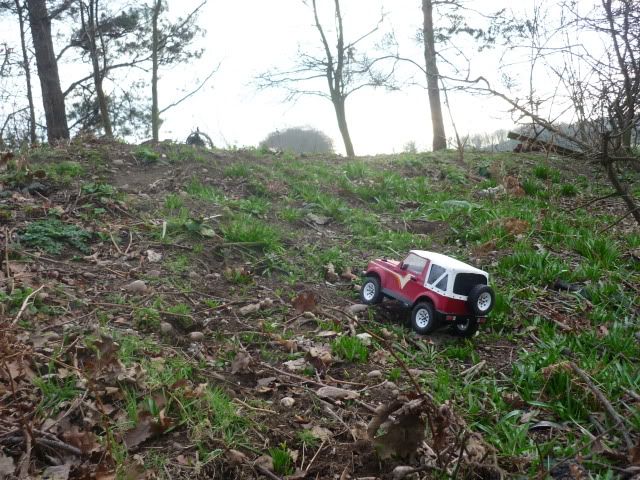
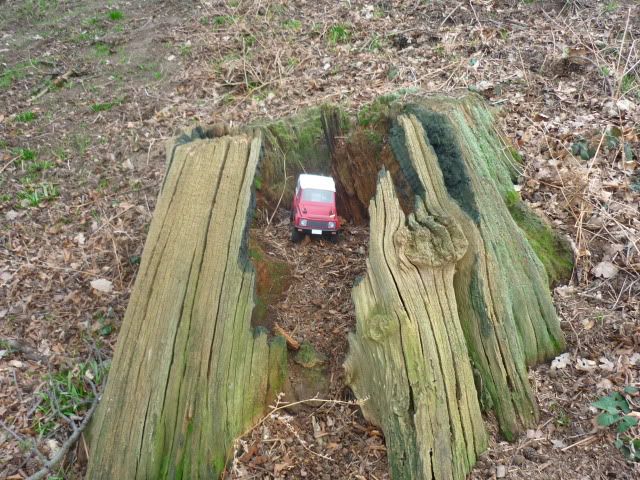

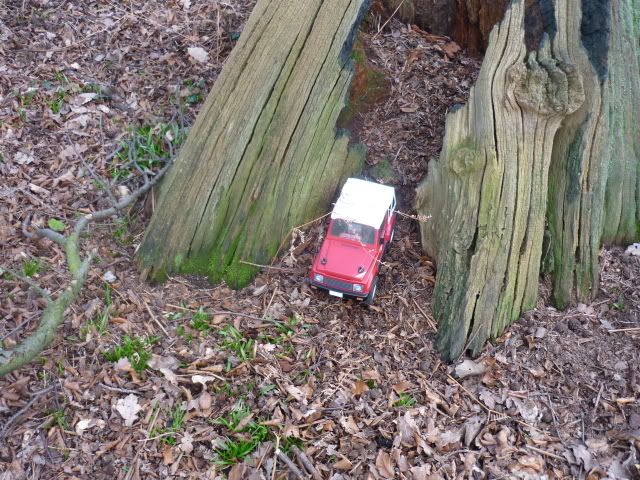
It was ok in the mulch but struggled in the leaf litter, especially up hill, I can't help but think more agressive tyres would help... but they wouldn't look right
http://youtu.be/Q-fMPAzI6xE
I quickly worked out it ran much better on the paths & down hill!
http://youtu.be/CLeJPYG-d1c
http://youtu.be/KVEzuDVkCOk
And before anyone says my missus already says I'm a geek!
__________________________________
No Mud to Deep, No Hill to Steep!
http://www.suzukiclubuk.co.uk |
|
| Back to top |
|
|
Tramp
Off-Road Guru
Joined: 16 May 2007
Odometer: 1745
Location: Rotherham
1992 Suzuki Samurai
|
| Posted: Sat Apr 28, 2012 5:37 pm Post subject:
|
|
|
Well its been sat on top of the kitchen cupboard for a while and today I dug it out, I had trouble with the weight being mounted so high (so it rolled over more than I liked) I decided the best bet would be to mount the battery lower, the only space available was down either side between the wheels, so I mounted a battery to each side (pannier style), this should keep my centre of gravity much lower. To do this I used a few body posts, some channel I had laying around from an old fire surround and some 15mmx15mm aluminium box section, first I tried to tap the box section for mounting but struggled getting a good thread on the 1.5mm thick wall, so i opted for bolt fixings instead.

With the body on you can see it is a tight fit but ok!
I mounted the battery boxes low enough to protect the lexan body from scraps as it did sometimes 'ground' on the sills, with these mounted a couple of mm lower the body shouldn't get damaged

Cheers
__________________________________
No Mud to Deep, No Hill to Steep!
http://www.suzukiclubuk.co.uk |
|
| Back to top |
|
|
Sman
Articulating
Joined: 21 Aug 2009
Odometer: 676
|
| Posted: Sat Apr 28, 2012 9:09 pm Post subject:
|
|
|
nice
are those shells still available?
__________________________________
Zombie Disposal Unit |
|
| Back to top |
|
|
damohick
Winch Assistant
Joined: 30 Dec 2007
Odometer: 72
Location: North Norfolk
|
| Posted: Fri May 04, 2012 8:49 pm Post subject:
|
|
|
| They are, but a bit like hens teeth.
|
|
| Back to top |
|
|
|


